Use React hooks to do delta update

When development web application, sometime, we need to update just one or two property of an entity with many fields. Actually it is so sure to not update all the fields when user just update some part of the entity.

In React, it is one-way data biding. For example, you bind the object property value to an input field. When you change the field value, it won’t change the object property value accordingly. You need to hand it by yourself.

To do that, we need to pull out the delta changes and pass that to server and handle the update specifically.

First, capture the delta changes in React

You can use React useState() hooks to initial the entity with empty object

const EntityMasterComponent = (entity) => {
    const [entity, updateEntity] = useState(entity);
    const [deltaChange, updateDeltaChange] = useState({});

    ...

    const handleChange = (fieldName, fieldValue) => {
        updateDeltaChange({
            ...deltaChange,
            [fieldName]: fieldValue
        })
    }
    ...
    return (<div><form>
        <input name="field1" value={entity.field1} onChange={event => handleChange('field1', event.currentTarget.value)} />
        <input name="field2" value={entity.field2} onChange={event => handleChange('field2', event.currentTarget.value)} />
    ...
    </form></div>)
}

From the above example, we define a deltaChange state with an empty object. Every time when some field is updated, the handleChange function is called and the field name and value is set into the deltaChange state.

When user want to save the change, you can pass the deltaChange state into the request body as below:

const doSave = () => {
    fetch("/entity/" + entity.id, {
                method: 'put',
                headers: {
                    'Content-Type': 'application/json'
                },
                body: JSON.stringify(deltaChange)
            }).then(resp => resp.json())
                .then(resp => console.log(resp.msg))
                .catch(err => console.log(err));
}

On server side, you should be able to get the map of delta changes and process validation and update storage.

Build Spring boot with gradle and webpack

When you want to run spring boot microservices with a web user interface which is bundled with webpack, you may want to integrate the webpack into gradle.

Usually microservices is running without web user interface, it exposes its API to other service or client directly. Which means, you should develop the microservices and web user interface in separated projects.

But there is always exception in real practice. If you just want to put your webpack bundle in the spring boot application, and run spring boot application with the web user interface, you can follow the guide below.

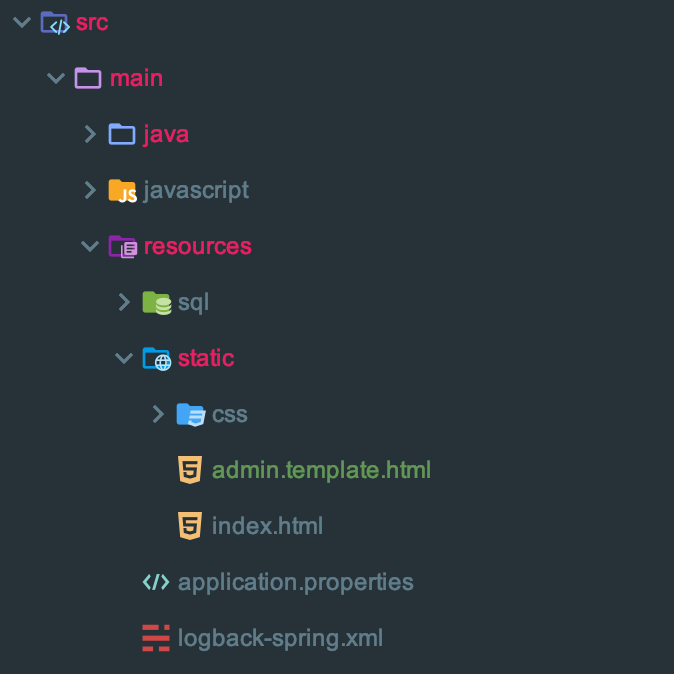
Screen Shot 2019-08-07 at 5.46.34 PM

First, create your web content resources in your spring boot project

Usually, you can access spring boot static web content under /src/main/resources/static, or /src/main/resources/public folder, you should place your html, css or image files here.

Please notice that the admin.template.html is the webpack entry page, you could use the default index.html. Place package.json and webpack.config.js as needed into the project root path. There is no special settings for these two files.

Then add the following lines in build.gradle file

bootJar {
    ...
    sourceSets {
		main {
			resources {
				exclude 'static/admin**'
			}
		}
	}
    ...
}

task webpack(type: Exec) {
     commandLine "$projectDir/node_modules/.bin/webpack"
}

processResources.dependsOn 'webpack'

The task webpack is to tell gradle how to execute webpack command.
On the other side,
webpack creates a bundle js file as well as uses the entry page template in your project (here is admin.template.html which you can define it in webpack.config.js), it will copy the template file to the build patch and add the bundle js reference to the html.

As gradle copies the resource to build path, it will override any file each time when run the build. To avoid gradle build overwrite webpeck entry page, you need to exclude the target entry page from the source path.

Now you can just run the following command to build web user interface as well as spring boot application at a time

gradle bootRun 

In addition, if you want to watch the build update for development, just run watcher with webpack command

webpack --watch

Then after you run spring boot, you could keep updating the bundle js file for development purpose.

智能手表于运动手环之争

FITBIT的首席执行官(CEO)Park最近接受cnbc的采访时提到,“并不是所有人都佩戴智能手表”, “FITBIT的成功之处是提供多种款式的不同设备,并主要关注健康追踪”。这就是说,目前消费者对智能手表和健康追踪设备的功能比较混乱,对它们的长期佩戴的实用性产生质疑。其实一个主要的消费者会问的问题是,如果购买一款苹果手表,我能得到什么有用的功能(实用性)。苹果手表的外观时尚漂亮是不错(nike运动版除外,那款合作设计的手表个人觉得比较难看),内在的功能也很多(比运动手环多多了)。按道理,消费者应该买一款苹果手表就足够满足需要。事实是,部分购买苹果手表的用户在佩戴了一段时间后,就开始不会天天佩戴,有时戴回传统的手表,不象iphone那样,每天带在身上。也就是说,如果一款电子产品是靠时尚和漂亮吸引,就不会有持久的吸引力,因为人会审美疲劳。还是只有贴合自己需要的实用性强的产品,才有长期佩戴的习惯。苹果手表目前仍然没有找到让用户长期佩戴(天天不离)的卖点,当然,可以看出苹果仍在努力,也许当用户可以不在需要带手机而苹果手表也能提供同样功能时,就会大受欢迎。

再看FITBIT, 它家的大部分设备并不属于智能手表,而只是健康传感器加上自家的封闭系统,配合手机(支持各种平台,包括windows phone和个人电脑)上的软件提供健康分析和实时提醒等多种功能。但对比苹果手表,它不提供除健康意外的其他功能。不过提供信息提醒和音乐控制等使用功能。基本上,如果你并不感兴趣于用这款设备了解自己的健康状况并希望提供运动监督,你不会对fitbit有兴趣。但是如果你是个运动活跃分子,喜欢了解和辅助自己的日常活动,你会喜欢fitbit的产品、garmin的产品或其他。因为,你要做的事情不同,你需要关注你的自身健康,你需要每天都追踪。每天都了解状况,每天都能提供建议与监督。良好健康的习惯是需要长期坚持某些活动获得的,不是短期行为,所以长期佩戴健康追踪设备就变得有价值了。当然,苹果手表2代也开始强调健康功能,这其实不太影响fitbit, 因为,消费者关注点不同,欧美消费者大都知道花多少钱、做什么事这个观念,而不会购买功能多而不精于某方面的更贵的产品。

Hibernate search 实践[1]

如果在JEE的项目中使用了hibernate 作为数据的持久层框架,那么在涉及到数据全文搜索时(fulltext search),如果系统需要对用户输入的关键字进行分析查询,然后得出匹配排序的搜索结果,可以考虑使用hibernate search组件。

一般情况下,你也可以使用hibernate本身提供的DetachedCriteria类来进行多个字段的查询,从而实现全文检索的效果。参考的代码如下:

Junction junction = Restrictions.disjunction()
.add(Restrictions.like(“website”, search, MatchMode.ANYWHERE).ignoreCase())
.add(Restrictions.like(“company”, search, MatchMode.ANYWHERE).ignoreCase())

这样可以对表中的所有字段来查询。然而, hibernate在执行这种查询时使用HQL(最后都是使用SQL标准查询语言),这样其实还不是真正意义上的全文检索,而且这种查询会随着字段数量的增加而降低性能。

hibernate意识到这一点,面对互联网搜索引擎的强大检索性能的挑战,高效而易于实现的全文检索是开发数据库应用程序的一个重要需求。hibernate推出了基于lucene search的全文检索集成。

lucene search是apache一个有名的全文索引引擎,其主要的功能是做内容索引及查询服务。详细的技术细节可以参考apache lucene网站,这里不作详细解释了。

要在使用了hibernate框架的项目里使用hibernate search,可以按照以下几个步骤进行:

第一、获得类库及配置

Java 版本为1.5 以上, hibernate 3
你可以到hibernate search官方网站上下载其最新的api (目前版本是3.1.0 GA)
要使用hibernate search,需要在代码中使用到Java1.5支持的Java声明技术,所以你要下载hibernate annotation,这个是hibernate的声明类库。

另外,如果你的Java对象里使用了高级的hibernate集合影射,还需要J2EE包的annotation。

把这些类jar文件放到你的开发、编译及运行环境中。清单如下

# hibernate-search
3.1.0.GA
#hibernate-annotations
3.4.0.GA
#hibernate-entitymanager
3.4.0.GA
#solr-common
可选
1.3.0
#solr-core
可选
1.3.0
#lucene-snowball
可选
2.4.0

接下来配置一下hibernate的properties,有两个基本属性

property name=”hibernate.search.default.directory_provider” value=”org.hibernate.search.store.FSDirectoryProvider”

property name=”hibernate.search.default.indexBase” value=”/var/lucene/indexes”
*这个是指定lucene引擎在索引是产生的索引文件的存放位置

如果你使用了spring框架,你可能需要在对象被创建、更该或删除后hibernate自动更新lucene的索引,你还需要向spring框架里添加event listener,下面是所需的配置参考代码

这样,基本的环境配置就完成了,可以进行下一步编码的调整了

第二、调整索引编码

要使hibernate search可以索引对象的数据,你需要对hibernate的实体对象entity进行索引声明调整,以一个简单的带集合影射的contact bean为例

@Entity
@Indexed
public abstract class AbstractBean{

private Integer id;

@Id
@GeneratedValue(strategy=GenerationType.AUTO)
@DocumentId
public Integer getId() {
return id;
}

… …
}

@Entity
@Indexed
public class Contact extends AbstractBean{

@Field(index=Index.TOKENIZED, store=Store.NO)
private String phone;
@Field(index=Index.TOKENIZED, store=Store.NO)
private String fax;
@Field(index=Index.TOKENIZED, store=Store.NO)
private String mobile;
@Field(index=Index.TOKENIZED, store=Store.NO)
private String zipCode;

@OneToMany(fetch = FetchType.EAGER)
@Cascade(org.hibernate.annotations.CascadeType.ALL)
@IndexedEmbedded
private List emails = new ArrayList();

}

@Entity
public class Email extends AbstractBean{
@Field(index=Index.TOKENIZED, store=Store.NO)
private String email
}

请留意@index, @Field, @OnToMany, @Cascade, @IndexedEmbedded等,hibernate (lucene) 提供针对不同搜索内容的index声明,用于优化索引的内容以及查询的结构。

如果不需要特殊索引要求,可以保存这些声明调整,进行下一步搜索工作。

第二、使用全文搜索

也许你在引入使用hibernate search功能前,系统的数据库已经存储了一定数量的数据了,为了能够搜索到已有的数据,必须手动索引现有数据,做法如下:

public Integer reindexFullTextSearch(){
FullTextSession fullTextSession = Search.getFullTextSession(session);
Transaction tx = fullTextSession.beginTransaction();

List contacts= super.getSession(false).createQuery(“from com.test.Contact as contact”).list();
for (Contact contact: contacts) {
fullTextSession.index(contact);
}

tx.commit();

logger.info(“Contact reindex fulltext search results: “+contacts.size());

return contacts.size();
}

这个方法可以触发hibernate search对现有的contact数据做索引,在hibernate环境中运行这段码,你会在之前配置的索引目录下看到索引文件的更新。当然你打不开它,因为是二进制文件。

完成这步后,因为你在配置hibernate search时定义了event listener,以后当对象被创建、修改或删除时,都可以自动地更新索引了。这听起来不错,那要怎样搜索呢?请看下面的代码:

public java.util.Collection fullTextSearch(String keyword, Integer start, Integer limit, String sortCriteria, String sortOrder){
FullTextSession fullTextSession = Search.getFullTextSession(this.getSession());
Transaction tx = fullTextSession.beginTransaction();

// create native Lucene query
String[] fields = new String[]{“id”, “phone”, “fax”, “mobile”, “zipCode”, “Email.email”, };
List results = null;
try{
MultiFieldQueryParser parser = new MultiFieldQueryParser(fields, new StandardAnalyzer());
Query query = parser.parse( keyword );
// wrap Lucene query in a org.hibernate.Query
org.hibernate.Query hibQuery = fullTextSession.createFullTextQuery(query, Contact.class);
// execute search
// paging (optional)
if (start!=null && limit!=null) {
hibQuery.setFirstResult(start);
hibQuery.setMaxResults(limit);
results = hibQuery.list();
}else{
results = hibQuery.list();
}

logger.info(“Contact fulltext search results: “+results.size());

}catch(Exception e){
logger.error(“Failed to run fulltext search: “+e);
}

tx.commit();

return results;
}

你会看到,关键字keyword会被首先分析,然后进行查询。缺省情况下关键字keyword的分析是StandardAnalyzer,这个关键字分析是全文检索的重要功能,如果需要针对不同的语言做分析,可以选择不同的分析器。

在hibernate环境下运行这段代码,你可以得到返回的搜索结果。

ClientVision CRM wiki 维基文档


ClientVision CRM wiki is in progress. You could see it on

http://wiki.clientvision.cn

ClientVision is a CRM product which is customized for Recruiting business. Started from 2006, this java web baseed application use spring framework + hibernate, and dual database, PostgreSQL and eXist XML DB.

To use dual database is because it is time for energy-saving and environmental protection. Use XML database to save development resources and efficient for some user cases. This obviously save customer’s budget under this economic crisis.

ClientVision CRM的维基文档正在编写中. 你可以在输入下网址查看

http://wiki.clientvision.cn

ClientVision (还没有中文名)是一个专门针对猎头/人力资源服务公司的客户关系管理CRM软件。这个产品开始于2006年,技术架构使用spring框架+hibernate,同时采用双数据库-“混合动力”,PostgreSQL和eXist纯XML数据库,都是开源项目。

之所以使用“混合动力”是因为现在需要环保与节约。使用XML数据库可以节省开发工程师的人力,并在某些应用情况下提高效率。这自然可以在经济危机下节省客户的开销。

Extjs与XML的结合应用,组件化的web界面开发

使用JEE架构开发web应用程序的技术人员一定会关心并尽力提高web客户端界面的开发效率。由于web的日益广泛使用,越来越多的商业软件用户倾向采用支持HTTP协议的web客户端界面。原因是用户无需再安装客户端软件并可以随时随地通过互联网使用应用软件。

传统的桌面软件的界面开发都采用与开发工具整合(IDE)的界面组件设计器来完成软件界面的设计与实现,并已经有大量丰富的设计工具软件和资源可以使用。使开发人员的界面开发工作变得容易与高效。

Web界面开发有别于传统的桌面软件界面开发,其中涉及的标准与技术很多而且复杂,拿一个JEE的Web界面开发所使用到的技术为例,其中就包含以下的技术:

HTML/CSS, Javascript, DHTML, JSP/Servlet, XML, 不同浏览器的兼容性等,

这些技术本身都各不一样,需要全部掌握才可以熟练开发;而且,到目前为止,还没有那一个集成开发工具可以把这么多的技术成功融入到可以独立使用的组件里,象桌面开发那样。

不过使用AJAX技术的一些javascript框架的发展使得Web界面开发也可以组件化的需要可以得以满足了。这就是

Extjs与XML的结合应用,组件化的web界面开发

Extjs 是一款优秀的应用Ajax的javascript组件框架,这款框架是一个开源的框架,前身来自Yahoo的UI开源javascript库。而Extjs的开发者把它作进一步的发展,使得这个javascript的框架与UI的HTML界面元素结合并提供更丰富的组件化开发。要取得这个框架或者详细的文档资料,可以访问其网站 http://extjs.com

XML就不作详细介绍,这是一个互联网的信息媒介标准,并日渐大量使用在现在的信息系统开发中。这里要介绍的是如何使用XML作为数据的传输格式与组件化的Extjs框架结合使用,使得Web界面的开发效率、性能与功能都得到提高。

我们看一个十分普遍而简单的常见例子,开发一个城市名称下拉菜单

XML数据
=================================


1北京
2上海
3广州

Extjs 的数据存储
=================================


locationStore = new Ext.data.Store({
// load using HTTP
url: 'util.html',
baseParams: {act:'loadValueList', id:'location'},
reader: new Ext.data.XmlReader({
totalRecords: 'results',
record: 'listItem'
}, [
{name: 'key'},
{name: 'value'}
])
});

Extjs 的下拉菜单组件
=================================


localeCombo = new Ext.form.ComboBox({
mode:'local',
store: locationStore,
value: 'en',
hiddenName: 'locationId',
valueField: 'key',
displayField:'value',
width: 130,
triggerAction: 'all',
forceSelection:true
});

这是一个非常简单的例子,把城市的名称显示为一个下拉菜单,供用户在web的表单里选择。这个简单的例子是为了演示使用Extjs可以把一个下拉菜单的组件分为数据、模型和视图,跟Web的MVC框架是一个道理,不过这是在客户端。

这样做可能会使得客户端的组件开发变复杂了,但好处是可以把组件的显示与数据绑定分开。我们知道web界面的开发的一个最头痛的问题是如何使相同的一个组件在不同的浏览器下能够显示相同的特性,具有相同的行为。Extjs把数据绑定抽离出来,的确解决了这个问题,同时带来的好处是数据与组件显示的可重用。

这是开发专业的web界面与富客户端rich-client应用程序的必须。

Extjs目前支持两种格式的数据,JSON与XML,JSON是JavaScript Object Notation, 就是一种用于JavaScript脚本的数据传输处理格式。这种格式比XML简单,处理起来相对容易,也是Extjs推荐的。不过使用XML就更为标准。

发布基于OpenCms网站内容管理系统的网站

发布基于OpenCms网站内容管理系统的网站

http://www.tongtaipawn.com 广东省通泰典当行

该网站使用OpenCms7 开发, HTML采用div+css的代码布局以便更容易控制样式和对搜索引擎友好

网站提供了一个方便典当行发布黄金和白金的典当价与断当价格的工具,一个访客与典当行的问答论坛。这两个功能可以帮助典当行把最重要的业务信息及时地与用户通过互联网进行交流。

database design – Key Value Pairs

As we know there is some key value pairs (KVP) using in database design. And it is very common in lots of projects. I forget what the actually purpose is at the moment. But I feel that some KVP design in commercial software product will make the maintenance and development a pain.

The reason is simple, developer needs to convert the key to value in SQL or Java class. Here a sample.

KVP for language

1, “English”
2, “French”
3, “German”
4, “Spanish”
5, “Japanese”
6, “Russian”
7, “Korean”
8, “Mandarin”
9, “Cantonese”
10, “Other”

For the language storage, we save key in module table like language skill, candidate master. When we retrieve the data for candidate or language skill, we need to convert the language key to value so it displays the right text on browser. On the other side, when user searches data with language, like “German”, it needs to convert “German” to “3” so that query can indentify the language key in record.

For this case, I think the KVP is useless. It makes search more complicated.

I remembered that I discussed with some experienced DBA about this long time ago. The one purpose of using KVP in SQL database design is to optimize the storage of data, to save hard drive space. Now a truth is hard drive and memory becomes much powerful and large than before. I think software design is stepping out the time of hardware bound so developer can focus on software creativity than saving hardware resources.

Of course, it doesn’t mean we just throw all KVP in database design. But we had better to keep in mind to change the software design from computer oriented to business oriented.

伴随网络成长的一代

转载:阿根廷《民族报》

现在青少年的房间里大多会出现这样的场景:开着电视和电脑,iPod的音量调到最大,作业本打开着,同样打开的还有电脑屏幕上的许多“窗口”,google网站显示着搜索结果、聊天页面正在闪烁。这就是现代青少年“做作业”的情景。

“一心多用”的本领是新一代人的集中特点。这是看电视时“跳过广告的一代”,他们将这一本领衍生到了从手头的一件事情跳到另一件事情,学习、工作、人际交往、等一样也不耽搁。他们的父母和老师们总是抱怨:“这些孩子好像从来不会从头到尾地完成一件事情,不会坚持不懈。要他们对一件事情保持长久的兴趣或承诺很难。”

1984年到1995年间出生的孩子现在年龄在12岁至24岁之间。他们的生活离不开电脑,他们与电脑差不多时间诞生,并在互联网的陪伴下成长。尽管这待人因地域不同而有一些差别,却已经成为一种全球现象。

这一代的年轻人更青睐时间灵活,团队优秀、气氛良好的工作。他们很少对所在的公司从一而终,不喜欢受约束,善于抓住机会。因此,他们会毫不犹豫地辞职去休假,然后开始期待已久的旅行或者参加一项对他们来说更刺激的活动。

与网络亲密无间

现在很多年轻人习惯在聊天框中写上一个小提醒,例如“我在吃饭”、“我去洗澡”等,总之永远也不会与对方失去联系。因此,这一代年轻人“需要时刻保持联系”,这与之前几代人的隐私观念大相径庭。他们通过博客毫不费吹灰之力地展现自己,尤其是照片博客。在这一代人的生活中,电脑取代电视的趋势逐渐明显。面对电视的被动性,这些年轻人更愿意选择具有互动性的新兴传媒。

Ubuntu linux的使用感受

使用了Ubuntu linux 8.04操作系统近两个多星期,现在写点使用体会来说一下我对这款开源操作系统的个人意见。作为体会,需要一个作为比较的其他操作系统,我之前使用过其他版本的linux(SuSE, Fedora),不过如果拿linux的各个不同发行版做比较,就象拿一对双胞胎来比较长相,他们的差别不会十分明显。因为我没有使用过Windows Vista,所以就用最长适用的windows xp来比较了。

Ubuntu的速度比xp快

毫无疑问,从系统的安装到启动到使用的整个过程,都是Ubuntu的速度比较快。而且在硬件兼容性方面,Ubuntu已经跟xp相当了,这是为什么安装过程可以很顺利并启动后各项硬件都工作良好。当然,我的xp使用很久,安装了很多的软件,启动时会有更多的程序需要加载,比如:杀毒软件,手机同步,IM等,而Ubuntu则没有。不过即使是打开浏览器,运行java,开启Eclips之类,都是Ubuntu的较快。而且可以明显体会一点,无论在使用多长的时间,在内存足够的情况下(我的机器是1.5G内存),打开程序的速度始终是Ubuntu的快而且不回有变慢的现象。

Ubuntu的桌面比xp炫

之所以使用“炫”这个字眼,是因为我开启了Ubuntu的3D和其他效果,这使得在Ubuntu下操作桌面和窗口变得很有趣和cool,而xp就明显没有这种乐趣。当然,这种效果是否真的十分实用,我倒不这么认为。不过在人们使用很长时间的电脑面前,能够提供操作的趣味,是一个很好的改进方向。但不是取胜于xp的充分条件

Ubuntu的应用比xp丰富

这里所指的应用是指执行不同任务的软件,得益于开源的策略,大部分的软件在Linux上都免费提供,你可以很容易在连接了互联网的电脑上安装你想要的各种软件,完全免费而且工作良好,当然,这也造成Ubuntu很依赖internet,不过现在我也很少使用不联internet的电脑。安装软件需要使用新立得软件包,或者使用命令,这对普通用户有点难,不过可以学会。所以我只是花了总计一天左右的设置,就基本地让Ubuntu成为我可以工作的电脑了。

另外,Ubuntu与windows的互操作性也有了很大提高。我的两个磁盘分区在不经过任何调整的情况下,可以良好的被Ubuntu访问和操作,数据可以共享。这一点也是我可以不用切换到xp的原因。

然而,我在写这篇blog时是在xp下面的,我又切换回来了,是因为

xp的第三方商业软件比Ubuntu多

这是一个很明显的优,Ubuntu的优点也恰恰是它的一个有待发展改善的缺点。因为开源免费,坦白讲,大部分优秀的第三方商业软件都不原意提供Linux平台的版本。为什么?很简单没有利润的事情,从来都不容易让人提起长久的兴趣。所以Ubuntu下的软件大多都很简朴,有时很容易找到bug,这对于商业应用,是致命的。在windows下,各个软件商其实已经形成了很好的共生关系(不管微软有多成功而且比较霸道,无法否认,很多软件商在这个平台上生存着),所以每个软件产品在windows下能够一个持续的利润保障,使它可以发展到比较完善的地步。而在Ubuntu下,软件好像是在街市摆摊的白菜,没有一个统一和良好的保障。他们之间的互操作性就更不用说了,是有待更大的改善。

xp的操作比Ubuntu更简便

虽然我很喜欢Ubuntu的操作,这就像操作一台专业的数码相机和使用一台普通傻瓜相机的感觉。在xp上我不需要担心我的这项操作会否失败。 而有时我在ubuntu上做拷贝、黏贴的操作,却会有失败的可能。不过我相信这一项可以在以后的版本中得到改善。

所以目前, 我还是要使用xp,虽然我很喜欢Ubuntu。